Basics
Integrating digital software with a ham radio requires establishing CAT (Computer Aided Transceiver) control as the foundation, allowing applications to communicate frequency and mode data simultaneously.This is typically achieved using a CAT sharing server like OmniRig (Windows) or Hamlib’s rigctld (cross-platform), which holds the serial/USB connection to the radio and allows multiple programs to read and control it without port conflicts.
To complete the integration, connect the following components:
- Digital Mode Software: Use fldigi for a wide range of open-source modes (PSK31, Olivia, RTTY) or WSJT-X for FT8/FT4, ensuring they are configured to receive frequency data from the CAT server.
- Logging Software: Install N1MM+ or Log4OM to automatically log contacts with accurate metadata (frequency, mode, callsign) by connecting to the same CAT server or via UDP broadcast from digital mode software.
- Audio Routing: Use Virtual Audio Cables (e.g., VB-Audio VoiceMeeter) to route audio between the radio interface, digital decoders, and logging software, eliminating the need for physical audio patch cables.
- Band Monitoring: Integrate an SDR panadapter (using software like SDR# or SDR-Console) to provide a real-time visual of the band, which can be linked to the CAT server to tune the radio by clicking the spectrum display.
Hamlib
Hamlib is the industry standard for Linux, Mac, and Windows, especially for SDRs.- Setup: Install Hamlib and run the rigctld daemon.
- For Linux Mint 22.3, the recommended method to install Hamlib is via the package manager for stability, or by compiling from source if you require the latest features or specific radio drivers (such as for the FT-991).
-
                sudo apt update

sudo apt install libhamlib-dev hamlib-utils -
Option2 - Compile from souce
- Install dependancies
sudo apt install build-essential autoconf libusb-1.0-0-dev libudev-dev libpng-dev libsndfile1-dev portaudio19-dev libfltk1.3-dev libsamplerate0-dev -
Download and Build:
                  git clone https://github.com/Hamlib/Hamlib.git

                  cd Hamlib

                  ./bootstrap

                  ./configure

                  make

                  sudo make install

                  sudo ldconfig
-
Verify Installation:
rigctl --version -
Note: If you install from source, ensure your user has access to
serial/USB devices by adding your user to the dialout group:
sudo usermod -aG dialout $USER.
- Install dependancies
WSJT-Z
WSJT-Z on Linux Mint involves running a popular automated fork of WSJT-X.Create application install folder for WSJT-Z
/home/emcomm/Documents/Installs/WSJTZNav to new WSJTZ directory
Clone source for building:
git clone https://github.com/sq9fve/wsjt-z.git
Dependancies
        sudo apt install qtmultimedia5-dev

        sudo apt-get install qtbase5-dev libqt5websockets5-dev

        sudo apt install qttools5-dev qttools5-dev-tools
Then:
            sudo apt update && sudo apt install -y \
            build-essential cmake git gfortran asciidoc asciidoctor \
            qtbase5-dev qtchooser qt5-qmake qtbase5-dev-tools \
            libqt5multimedia5-plugins qtmultimedia5-dev libqt5serialport5-dev \
            libffi-dev libusb-1.0-0-dev libfftw3-dev \
            libboost-all-dev libasound2-dev texinfo
Configure and Compile
mkdir build && cd build
cmake
cmake -DCMAKE_Fortran_FLAGS="-std=legacy -fallow-argument-mismatch" ../wsjt-z
multi core
cmake --build . -- -j$(nproc)
Install
sudo cmake --build . --target install
Run
wsjtx(tr)uSDX
Using WSJT-Z with the (tr)uSDX requires connecting via USB for CAT control and configuring audio through a virtual cable or modified physical cables.
To enable full digital mode capability, the (tr)uSDX must run Beta Firmware 2.00u or later. This version introduces native USB Audio, eliminating the need for external sound cards or modified audio cables.
In WSJT-Z, you need to type in COM8 for the port selection for CAT control. COM8 will not be listed in the drop down, as it is a virtual COM port. Be sure to change the Audio input and output to the VB-Audio device (Virtual Audio Cable).
Essential Configuration Steps
- WSJT-Z Radio Settings:
- Set the Rig to Kenwood TS-480
- Serial Port to COM8
- Baud Rate to 115200 (or 38400 for older firmware)
- Data Bits to 8
- Stop Bits to 1
- Handshake to None
- PTT Method: Set PTT to CAT (or RTS if using a Digirig dongle with specific drivers).
- Audio: Set Input and Output to VB-Audio Virtual Cable (or Cable Input/Output) to handle audio transmission and reception digitally.
-
Firmware:
- Ensure the (tr)uSDX is running Beta Firmware 2.00 or later for proper FT8/JS8Call support.
- Semi-QSK: Disable Semi-QSK in the radio menu (Option 2.4) for digital modes.
- Mode: Ensure the radio mode is set to USB.
- Physical Audio (Alternative): If USB audio fails, use a 3.5mm patch cable from the computer’s speaker out to the (tr)uSDX mic input (with the tip disconnected) and headphone out to the computer’s mic input.
-
Common issues
- Connection Drops: Some users report disconnections; using physical audio cables instead of USB digital audio can provide more stability.
- Volume: Adjust computer volume to ~50% to prevent clipping and splatter, as the (tr)uSDX mic input is sensitive.
Use Virtual Audio Cables (such as VB-Cable or Loopback) for both Input and Output. Set the Input to the cable receiving audio from the radio and the Output to the cable sending audio to the radio.
Firmware:
Ensure the (tr)uSDX is running firmware version 2.00 or higher for stable USB/CAT communication.
Semi-QSK:
Set menu option 2.4 to Off for WSJT-Z perations; this should only be On for CW modes.
The (tr)uSDX's USB audio interface is designed to work with software like WSJT-Z, but proper configuration is essential for reliable operation.
Xiego G90
To connect your Xiegu G90 to software like WSJT-X or JS8Call via Hamlib, configure your rig settings with Rig: 3088 (Xiegu G90), a baud rate of 19200, 2 stop bits, and the correct serial port assigned by your operating system.
To connect your Xiegu G90 to Linux Mint, plug the USB-to-serial CAT
cable into the 3.5mm COM port on the left side of the radio's
head unit (below the speaker/headphone jack).
Identify the assigned device path in your terminal using dmesg, and grant your user account permissions to access the port via the dialout group.
Linux Mint restricts serial port access by default, which causes "Permission Denied" errors in logging or control software.
Add your current user to the dialout group by running:
Identify the assigned device path in your terminal using dmesg, and grant your user account permissions to access the port via the dialout group.
- Plug the USB cable into your Linux Mint computer and the G90 head unit.
- Open a terminal window and run the command
sudo dmesg | grep tty
orls /dev/ttyUSB*to find the assigned device, usually appearing as /dev/ttyUSB0 or /dev/ttyUSB1.
Linux Mint restricts serial port access by default, which causes "Permission Denied" errors in logging or control software.
Add your current user to the dialout group by running:
sudo usermod -aG dialout $USERSoftware Configuration
- Open your radio control or digital mode software (such as WSJT-X or FLrig).
- Select the exact serial device path you found earlier (e.g., /dev/ttyUSB0).
- Set your baud rate parameters. CAT control for normal operation typically uses 19200 baud (or 115200 for specific firmware update utilities), 8 data bits, and 1 or 2 stop bits depending on your application.
User Fixes
I did check and found that the “handle F1” was SPLT, I changed to
PRE/ATT. Also change WSJTX radio choice to Icom 710 and it now
is working.
I actually received one contact from another station- but right now Kp=6 so pretty poor conditions. But it is working normally
I actually received one contact from another station- but right now Kp=6 so pretty poor conditions. But it is working normally
APRS
To set up APRS with a computer, GPS dongle, and Baofeng, you need an audio interface (such as a Digirig or Mobilinkd TNC3) to connect the Baofeng to your computer, as the standard programming cable is data-only and cannot handle audio.Configuration
- Hardware Connection: Connect the Baofeng to the audio interface, then plug the interface into your computer. Connect the GPS dongle to the computer or mobile device running the APRS software.
-
Radio Settings:
- Disable squelch (SQL) and dual watch (TDR) in the Baofeng menu to ensure no packets are missed.
- Set the radio to the APRS frequency (e.g., 144.800 MHz in Europe, 144.390 MHz in the US) and adjust volume to prevent clipping.
-
Software Setup:
- Use Dire Wolf (a software TNC) on your computer to handle the AFSK encoding/decoding.
- Configure Dire Wolf to use the audio interface as both the transmit and receive device.
- GPS Integration: Ensure your APRS client (like APRSdroid on Android or Xastir/APRSISCE on PC) is configured to send position data from the GPS dongle to Dire Wolf, which then modulates the signal and transmits it via the Baofeng.
- Power Saving: Disable any battery-saving features on the Baofeng that might cut power during data bursts, and ensure the duplex is set to Simplex (zero offset) for APRS transmission.
Regional APRS-IS server
To connect, use port 14580 (User-defined Filtered Feed) on the following regional servers:North America: noam.aprs2.net
If you require a specific local server, you can view the status and list of individual servers at status.aprs2.net
You can find local 2-meter APRS (Automatic Packet Reporting System) servers, digipeaters, and I-Gates by tuning to regional VHF frequencies, using live tracking maps, or consulting local coordination groups.
Tune your 2-meter radio or SDR receiver to 144.390 MHz, the standard national frequency for APRS in North America.
Xastir (X Amateur Station Tracking and Information Reporting)
Xastir is a robust, open-source APRS client primarily designed for Linux/Unix environments, though it also supports Windows and macOS.It is actively maintained, with recent code updates occurring as late as March 2026 on its GitHub repository.
Platform & Interface:
Built on the X11 window system, it features a "retro-Unix" graphical interface that is highly functional but less modern than Windows-native alternatives. It is written in C.
Mapping Capabilities: It supports over 125 map formats, including raster, vector, and GeoTIFF. It can retrieve online maps (OpenStreetMap, weather radar) and cache them locally using Berkeley DB.
Features
- Advanced Objects: Full support for creating and modifying area objects, signposts, and items, making it invaluable for Search and Rescue (SAR) and event coordination.
- Weather Integration: Can overlay NWS weather alerts, radar, and storm tracks.
- Radio Direction Finding (RDF): Supports both Omni and Beam reports for tracking signal sources.
- Connectivity: Works with kernel-mode AX.25 packet radio, sound modems, and internet APRS-IS streams.
- Usage: Often favored by Linux enthusiasts and for fixed igate/digipeater stations due to its stability and scripting potential.
Xastir can be installed in a way that allows members of the
│ "xastir-ax25" system group to use a native Linux AX.25 interface from
│ within Xastir. Where available this configuration uses Linux
│ capabilities in order to limit the process's privileges to only those
│ required, falling back on installing the binary setuid where Linux
│ capabilities are not available.
│
│ This is recommended over the alternative of running Xastir directly as
│ root, but enabling it may be a security risk, so it is disabled by
│ default. If in doubt, or if you do not intend to use native AX.25
│ interfaces (using a serial TNC or Internet connection instead), it is
│ suggested to leave it disabled.
Initial Configuration
Generate Passcode
You need to have a passcode to use the software, run the following command replacing YOURCALL with your amateur radio callsign.
callpass YOURCALL
Passcode for ko6lvt is 22709APRS Callsign
Although you can just use your callsign to identify yourself it is best to use the standard suffixes used world wide. These suffixes are numeric codes used to differentiate the type of APRS station you are (IE: weather station / mobile boat / aircraft etc etc etc).When you show up on a APRS map your icon will be that of your suffix. If your callsign was VO1XXX and you wanted to use aprs on a boat you would use VO1XXX-8 and if you viewed your status online you would be displayed on the map as a boat icon.
The general list of suffixes are as follows:
-0 Your primary station usually fixed and message capable
-1 generic additional station, digi, mobile, wx, etc
-2 generic additional station, digi, mobile, wx, etc
-3 generic additional station, digi, mobile, wx, etc
-4 generic additional station, digi, mobile, wx, etc
-5 Other networks (Dstar, Iphones, Androids, Blackberry's etc)
-6 Special activity, Satellite ops, camping or 6 meters, etc
-7 walkie talkies, HT's or other human portable
-8 boats, sailboats, RV's or second main mobile
-9 Primary Mobile (usually message capable)
-10 internet, Igates, echolink, winlink, AVRS, APRN, etc
-11 balloons, aircraft, spacecraft, etc
-12 APRStt, DTMF, RFID, devices, one-way trackers*, etc
-13 Weather stations
-14 Truckers or generally full time drivers
-15 generic additional station, digi, mobile, wx, etc
Determine What APRS Server To Connect To
North America - noam.aprs2.netDirewolf
To add Dire Wolf as a networked AGW device in Xastir, run the Dire Wolf server first, then navigate to Interface -> Interface Control -> Add.Select Networked AGWPE from the interface type list, keep the default port 8000, and click Start to activate the connection.
Detailed Configuration Steps
Launch Dire Wolf from the command line before opening Xastir. By default, it automatically starts the AGW TCP/IP Socket Interface on port 8000 (and KISS interface on 8001).
You should see a message in the terminal:
Ready to accept AGW client application 0 on port 8000 ...
Xastir
Open Xastir and follow this specific menu path:- Navigate to Interface → Interface Control.
- Click the Add button.
- Select Networked AGWPE from the "Choose Interface Type" list and click Add.
- In the configuration dialog:
- Server Host name: Enter localhost (or 127.0.0.1) if running on the same machine.
- Port: Keep the default 8000.
- Pass-code: Leave blank (unless specifically configured in Dire Wolf).
- Path: You may change the default digipeater path (e.g., from WIDE2-2 to GATE or WIDE1-1,WIDE2-1) depending on your local network requirements.
- Click OK to save.
- Activate the Connection
- Back in the Interface Control window, ensure the new "Networked AGWPE" device is selected.
- Click the Start button.
- Verify the Status column changes to UP.
- Check the Dire Wolf terminal window; it should display:
!!!Attached to AGW client application 0...
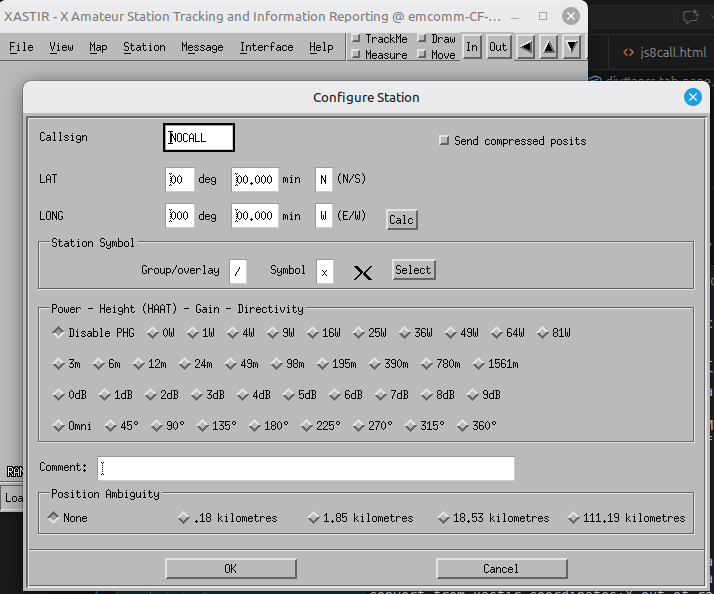
- Station Setup: Navigate to File > Configure > Station to enter your amateur radio callsign, GPS coordinates, and symbol suffix (e.g., -8 for a boat).
- Defaults: Go to File > Configure > Defaults to set whether your station is mobile or fixed and configure IGate traffic preferences.
- Interfaces: Open Interface > Interface Control, click Add, and select your connection type (e.g., Internet Server, KISS TNC, or GPS).
- For internet connections, enter the server address (e.g., rotate.aprs.net) and port (e.g., 14580).
-
Authentication and Maps
- Passcode: Generate a server passcode by running the callpass command with your callsign in the terminal. Enter this password in your Internet Interface properties.
-
Map Selection: Use Map > Map Chooser to select map sources.
OpenStreetMap (OSM) is recommended for online use, while local raster or vector maps can be added for offline use. You can layer maps (e.g., satellite background with vector roads).
-
Tracking and Monitoring
- Track Station: Go to Station > Track Station, enter a callsign, and click Track Now! to keep that station centered on the map as it moves.
- Find Station: Use Station > Find Station to search for specific calls.
- Bookmarks: Save favorite views via Map > Map Display Bookmarks by positioning the map, entering a name, and clicking Add.
- Objects/Items: Right-click the map to create objects (for moving items like weather) or items (for inanimate objects), or use the Station > Fetch Findu Trail menu to download historical tracks.
Configuring Direwolf with a Baofeng UV-5R typically involves using a hardware interface like a
Digirig or a custom audio cable to connect the radio to a computer or Raspberry Pi.
The process requires configuring the radio’s internal settings, setting up the audio interface, and editing the Direwolf configuration file to handle APRS packet decoding or transmission.
Successful connection to an IGate server or successful decoding of local packets confirms the configuration is correct.
While Direwolf and WSJT-X can be configured to operate on the same radio setup (e.g., sharing a PTT port), they are distinct applications serving different protocols:
The process requires configuring the radio’s internal settings, setting up the audio interface, and editing the Direwolf configuration file to handle APRS packet decoding or transmission.
Radio Configuration
Before connecting to software, adjust the Baofeng UV-5R settings to ensure clean audio transmission and reception:- Squelch (SQL): Set to 0 (open) to allow all incoming audio to pass to the computer for decoding.
- Dual Watch (TDR): Turn OFF to prevent interruptions during APRS packet reception.
- Frequency: Tune the radio to the local APRS frequency (e.g., 144.800 MHz in Europe or 144.390 MHz in North America).
- Volume: Set to approximately 50%; this can be fine-tuned later based on Direwolf’s audio level indicators.
Hardware Connection
- Audio Interface: Use a Digirig or a dedicated programming cable (black cable for audio, not the green programming cable) to connect the radio’s microphone/speaker port to the computer’s USB audio input.
- PTT (Push-To-Talk): If transmitting, you need a method to trigger PTT. This can be done via VOX (voice-activated) or a hardware relay controlled by the computer’s GPIO pins (e.g., on a Raspberry Pi).
Direwolf Configuration
Edit the direwolf.conf file to match your hardware setup:- Audio Device: Set ADEVICE to your USB audio card (e.g., plughw:1,0). Use arecord --list-devices on Linux to identify the correct card number.
- Audio Levels: Adjust the radio volume or interface gain so Direwolf’s audio level indicator stays around 50. Levels that are too high cause decoding errors.
-
Gateway/Tracker Settings:
- For an IGate: Set IGSERVER to your regional APRS-IS server and configure IGLOGIN with your call sign and passcode.
- For a Tracker: Set MYCALL to your call sign and use PBEACON to define position reporting intervals.
- For a Digipeater: Uncomment the DIGIPEAT section in the configuration.
Successful connection to an IGate server or successful decoding of local packets confirms the configuration is correct.
Direwolf cannot be used for WSJT-X
Direwolf is a software AX.25 packet modem and APRS encoder/decoder designed for packet radio, while WSJT-X is a separate software suite for weak-signal digital modes like FT8.While Direwolf and WSJT-X can be configured to operate on the same radio setup (e.g., sharing a PTT port), they are distinct applications serving different protocols:
- Direwolf: Handles APRS, packet radio, and digipeating.
-
WSJT-X: Handles FT8, FT4, JT65, and other weak-signal modes.
Hamlib is essential for WSJT-X (and its derivative WSJT-Z) to control radio hardware.
Hamlib provides the consistent API that allows WSJT-Z to manage functions such as frequency tuning, mode selection, and PTT (push-to-talk) for compatible radios.
AIOC
To setup an AIOC (All-in-One Cable) with Direwolf and a Baofeng UV-5R, you must connect the hardware, configure the operating system, and set the Direwolf software parameters to use the AIOC’s serial port for Push-To-Talk (PTT).Hardware Connection
Connect the Baofeng UV-5R to the AIOC using the appropriate TRS connectors (typically a 2.5mm for audio and a 3.5mm for PTT/programming, depending on your specific Baofeng model and cable type).Plug the AIOC into your computer via USB-C.
The device should enumerate as both a sound card (for audio) and a virtual COM port/ttyACM (for PTT and programming).
Operating System Configuration
Linux: Identify your AIOC’s serial port (e.g., /dev/ttyACM0) using dmesg or ls /dev/ttyACM*. Ensure your user has permissions to access the port (often requires adding the user to the dialout or plugdev group).Direwolf Configuration
Edit the direwolf.conf file with the following key settings:- Audio Device: Set the ADEVICE to your AIOC’s sound card.
- Linux: ADEVICE plughw:1,0 (replace 1,0 with your card index from arecord --list-devices).
-
PTT Control: Use the serial interface to control the radio’s PTT. Add or
modify the PTT line to use DTR/RTS signals.
Linux: PTT /dev/ttyACM0 -RTS DTR - Call Sign and Logn: Set your call sign with MYCALL and configure internet gateway settings (IGSERVER, IGLOGIN) if you wish to act as an IGate.
Radio Settings
- Turn off Squelch (SQL) in the Baofeng menu to allow all incoming audio to be forwarded to the computer.
- Turn off Dual Watch (TDR) to prevent interruptions.
- Turn off Dual Watch (TDR) to prevent interruptions.
- Set the volume to approximately 50% to ensure Direwolf receives clear audio without clipping.
Verification
Run Direwolf and check the console output. You should see audio levels reported (e.g., audio level = 50). If you are set up as an IGate, you should see connection confirmations from the APRS-IS server.If you experience intermittent PTT issues, ensure the TRS connectors are seated firmly, as loose connections are a common cause of failure.
Troubleshooting
- Baofeng Consistency: UV-5R radios vary in quality; if one unit fails to decode or transmit reliably, try a different unit.
- VOX vs. Direct PTT: If using VOX, adjust TXDELAY and DWAIT in the Dire Wolf config to account for the radio’s slow keying times. Direct PTT via a hardware interface is generally preferred for stability.
- Antenna: Ensure a decent antenna is connected, as APRS signals are weak and require adequate reception range.
GridTacker2
GridTracker features initial, community-driven or variant support for JS8Call via specific UDP configurations or WSJT-X server emulation, though native integration historically required specific packet structures from the JS8Call application side.You can track real-time digital decodes, map stations, and handle logging by ensuring your UDP port settings align between the applications.
Integration and Setup
- UDP Ports: JS8Call typically communicates over port 2242, whereas GridTracker listens on designated ports for live traffic parsing.
- ADIF Logging: You can manage log redundancy by feeding ADIF outputs or syncing logs directly while operating.
- Mapping and Roster: View decoded callsigns, Maidenhead grid squares, and real-time path trajectories on the interactive GridTracker map interface.
JS8Call-Improved
To route traffic successfully from JS8Call-Improved to GridTracker, you must trick GridTracker into treating the data stream like standard WSJT-X data.Because GridTracker natively uses WSJT-X data structures, you must configure JS8Call-Improved to simulate a WSJT-X server.
Configure JS8Call-Improved
- Open JS8Call-Improved and navigate to Settings > Reporting.
- Locate the UDP Server section.
- Check the box to enable the WSJT-X Server emulation.
- Set the IP address to 127.0.0.1 and change the UDP port to match what GridTracker expects (typically 2237 for WSJT-X, or keep it at 2242 if you manually match it in GridTracker).
Configure GridTracker
- Open GridTracker and click the Settings (gear) icon.
- Go to the General tab. ]
- In the Receive UDP Port field, ensure the port matches the one you assigned in JS8Call-Improved (e.g., 2237 or 2242).
- GridTracker will automatically begin decoding incoming traffic and mapping Maidenhead grids on the screen.
Known Limitations
No Call Roster Replies:Due to inherent UDP structural differences, you cannot click a callsign inside the GridTracker Call Roster to initiate a reply back inside JS8Call-Improved. Replying must be handled directly within the JS8Call-Improved chat interface.
Shared Port
Shared Port Conflicts: If you also use WSJT-X for FT8, ensure both software applications are not trying to send data to the same port at the same exact time to avoid traffic collisions.
Snips from the Docs
GridTracker’s IP address and Port settings must match WSJT-X’s. If they don’t the two applications won’t be able to communicate with each other.If you have opened WSTJ-X but don’t see “RECEIVE” in the control panel check your GridTracker settings.
At the top of the General tab the “Application Status” should read:
WSJT-X - ? - (127.0.0.1/2237)/JTDX - ? - (?)
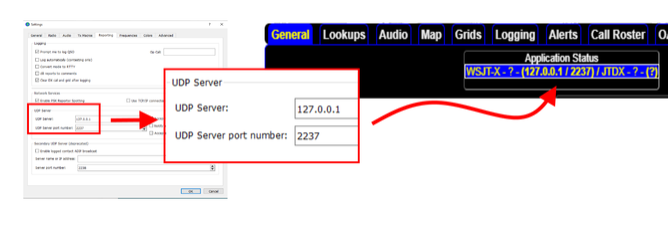
Note: if you’re running WSJT-X and GridTracker on separate computers use multicast address 224.0.0.73.
Easy |
SDR
Add user to plugdev group
sudo usermod -aG plugdev $USER
Drivers\gqrx
        sudo apt update
        sudo apt install rtl-sdr gqrx-sdr
Dependancies
sudo apt install libpango1.0-dev libcairo2-dev libjack-jackd2-dev
SDR++
Download ubuntu noble .deb
          cd ~/Downloads
          sudo dpkg -i sdrpp_ubuntu_noble_amd64.deb
          sudo apt install -f
SDRTrunk
SDRTrunk is a cross-platform Java application that runs natively on Linux, making the use of Wine unnecessary and potentially problematic for USB SDR hardware access.To install SDRTrunk on Linux Mint, you generally do not need to manually install Java, as the official SDRTrunk application bundles include a lightweight, stripped-down OpenJDK JRE specifically for running the software.
However, for P25 Phase 1 decoding, you must install the JMBE codec, which requires Apache Ant and a Java Development Kit (JDK) for compilation.
SDRTrunk includes native drivers for the following devices, requiring no external plugins
- RTL-SDR (RTL2832U based dongles)
- Airspy (Mini, R2, HF+)
- HackRF One
To configure a device, simply connect it, launch SDRTrunk, and select it from the Source dropdown menu in the main toolbar.
The only optional external component is the JMBE (Java MBE) library for digital voice audio decoding (specifically for IMBE/AMBE codecs used in P25 and DMR).
Go to View > User Preferences > JMBE Audio Library.
Click Create Library to download and install the necessary codec files directly within the application.
Key steps for initial configuration include:
- Verify Tuners: Ensure your SDR device appears in the "Tuners" section of the interface.
- Create a Channel: Use the Playlist Editor to define a system, add a site, and create a channel with the correct decoder (e.g., P25 Phase 1/2).
- Import Systems: You can manually enter control frequencies or import systems directly from RadioReference.com using your account credentials.
- Audio Setup: Configure your preferred audio playback device in the User Preferences if the default is not correct.
Dongle
1× RTL-SDR for conventional/single-channel; 2× for P25 trunking (one for the control channel, one for voice). The RTL-SDR Blog V4 with a 1 PPM TCXO is preferred — cheaper dongles drift and lose the control channelPlug in the hardware
— connect dongles via a powered USB hub (not directly to the PC). They should appear under Tuners in the SDRTrunk Configuration window. Name them (e.g., "Control" and "Voice") to keep track.Supported Codecs
- IMBE (Improved Multi-Band Excitation): Used by APCO-25 Phase I (common in public safety radio).
- AMBE (Advanced Multi-Band Excitation): Used by APCO-25 Phase II, DMR (Digital Mobile Radio), and dPMR.
Install
Visit the SDRTrunk GitHub Releases page and download the Linux x86 64-bit bundle (file starting with sdr-trunk-linux-x86_64) or the Linux ARM 64-bit bundle (file starting with sdr-trunk-linux-aarch64) if you are on an ARM-based system.Github Release
Nav to download location and unzip
Launch
(untarred application bundle file location)/bin/sdr-trunk
Drivers
            sudo apt purge ^librtlsdr
            sudo rm -rvf /usr/lib/librtlsdr* /usr/include/rtl-sdr* /usr/local/lib/librtlsdr* /usr/local/include/rtl-sdr* /usr/local/include/rtl_* /usr/local/bin/rtl_*
            sudo apt-get install libusb-1.0-0-dev git cmake pkg-config build-essential
            git clone https://github.com/osmocom/rtl-sdr
            cd rtl-sdr
            mkdir build
            cd build
            cmake ../ -DINSTALL_UDEV_RULES=ON
            make
            sudo make install
            sudo cp ../rtl-sdr.rules /etc/udev/rules.d/
            sudo ldconfig
To install IMBE
             sudo apt update
             sudo apt install build-essential git
Error E0554 Fix - switch to nightly build
            rustup install nightly
            cargo +nightly build
rustup install nightly
Install JDK and Apache Ant
           sudo apt update
           sudo apt install default-jdk ant
           unzip sdr-trunk-linux-x86_64-*.zip
           cd sdr-trunk-linux-x86_64-*/bin
Compile JMBE (Required for P25)
run:
which java
./build_jmbe.sh
Launch SDRTrunk
./run_sdrtrunk_linux.sh
Launch
Open a terminal and navigate to where you unzipped the application bundle and run the following shell script:
(untarred application bundle file location)/bin/sdr-trunk
re: /home/emcomm/Documents/apps/SDRTrunk/sdr-trunk-linux-x86_64-v0.6.1/bin
Tip
To add to panel
cp "/home/emcomm/Documents/apps/SDRTrunk/sdr-trunk-linux-x86_64-v0.6.1/sdrtrunk.desktop" ~/.local/share/applications/
To reload rules(for manual builds)
          sudo udevadm control --reload-rules
          sudo udevadm trigger
Dump1090
Linux Mint users typically install dump1090 (often the dump1090-mutability fork) to decode ADS-B signals from RTL-SDR dongles, rather than the older RTL1090 software which is primarily a Windows application.
sudo apt install dump1090-mutability
dump1090 can be started automatically via an init-script. Otherwise, the │
│ init-script does nothing; you must run dump1090 by hand. │
│ │
│ You can modify the options used when automatically starting dump1090 by │
│ running "dpkg-reconfigure dump1090-mutability" as root, or by editing │
│ /etc/default/dump1090-mutabilityUsage: Once installed, the software runs as a service or command-line tool, outputting decoded aircraft data to a local web server (usually accessible at http://localhost/dump1090/ or http://127.0.0.1:8080).
Compile Dump1090
- Dependancies:
sudo apt install git build-essential librtlsdr-dev libusb-1.0-0-dev pkg-config debhelper
Tip
Create .desktop
      [Desktop Entry]
      Name=WSJT-Z
      Comment=Amateur Radio Digital Modes
      Exec=/full/path/to/wsjtx
      Icon=/full/path/to/icon.png
      Terminal=false
      Type=Application
      Categories=HamRadio;Education;
      StartupNotify=true
NOAA weather Radio
For NOAA Weather Radio (Local broadcasts at 162 MHz), a standard vertical omnidirectional antenna (such as a quarter-wave whip or vertical discone) is required, as these signals are vertically polarized. Note that antennas designed for ADS-B (1090 MHz) or FM radio will not work effectively for these frequencies.NOAA Weather Radio (162 MHz) For local broadcasts (NWR), the signals are transmitted from fixed ground towers using vertical linear polarization. Vertical Omnidirectional Antenna: A simple quarter-wave whip (approx. 46 cm element) or a J-pole antenna tuned to 162 MHz is ideal. Discone: A wideband option that covers 162 MHz well, though less efficient than a tuned dipole or J-pole. 2-Meter Ham Antenna: Since 162 MHz is close to the 144–148 MHz amateur band, a standard 2-meter vertical antenna works effectively for reception.
1090 Hz antenna
A 1090 MHz antenna designed for ADS-B is optimized for the specific aviation band and performs poorly for other frequency ranges, such as VHF, HF, or UHF communications. While it may pick up some signals outside its target band, the performance drops significantly as the frequency moves away from 1090 MHz.For best results, use a dedicated 1090 MHz antenna for ADS-B aircraft tracking. If you wish to listen to other services, consider using:
- A discone antenna for VHF/UHF coverage.
- A long wire antenna for HF radio.
- A telescopic or dipole antenna for FM broadcast